Best Practice: Disable Direct Login to Salesforce – Transaction Security Policy

The implementation of Single Sign On (SSO) is a standard requirement for enterprises. SSO not only makes the login processes more comfortable for user, it as well allows companies to centrally control the access to applications. To enable central control it is required that SSO is the only option for users to access the application.

In Salesforce a user with SSO enabled has two options to access the system: (1) Using Single Sign On and (2) Username and Password.

To disable access to Salesforce additional features must be configured:

Disable login.salesforce.com (not enough)

The first option is to implement Salesforce My Domain, use the Identity Provider as the only option for login via My Domain and disallow users to login from login.salesforce.com.

Untitled.png
Salesforce My Domain Settings

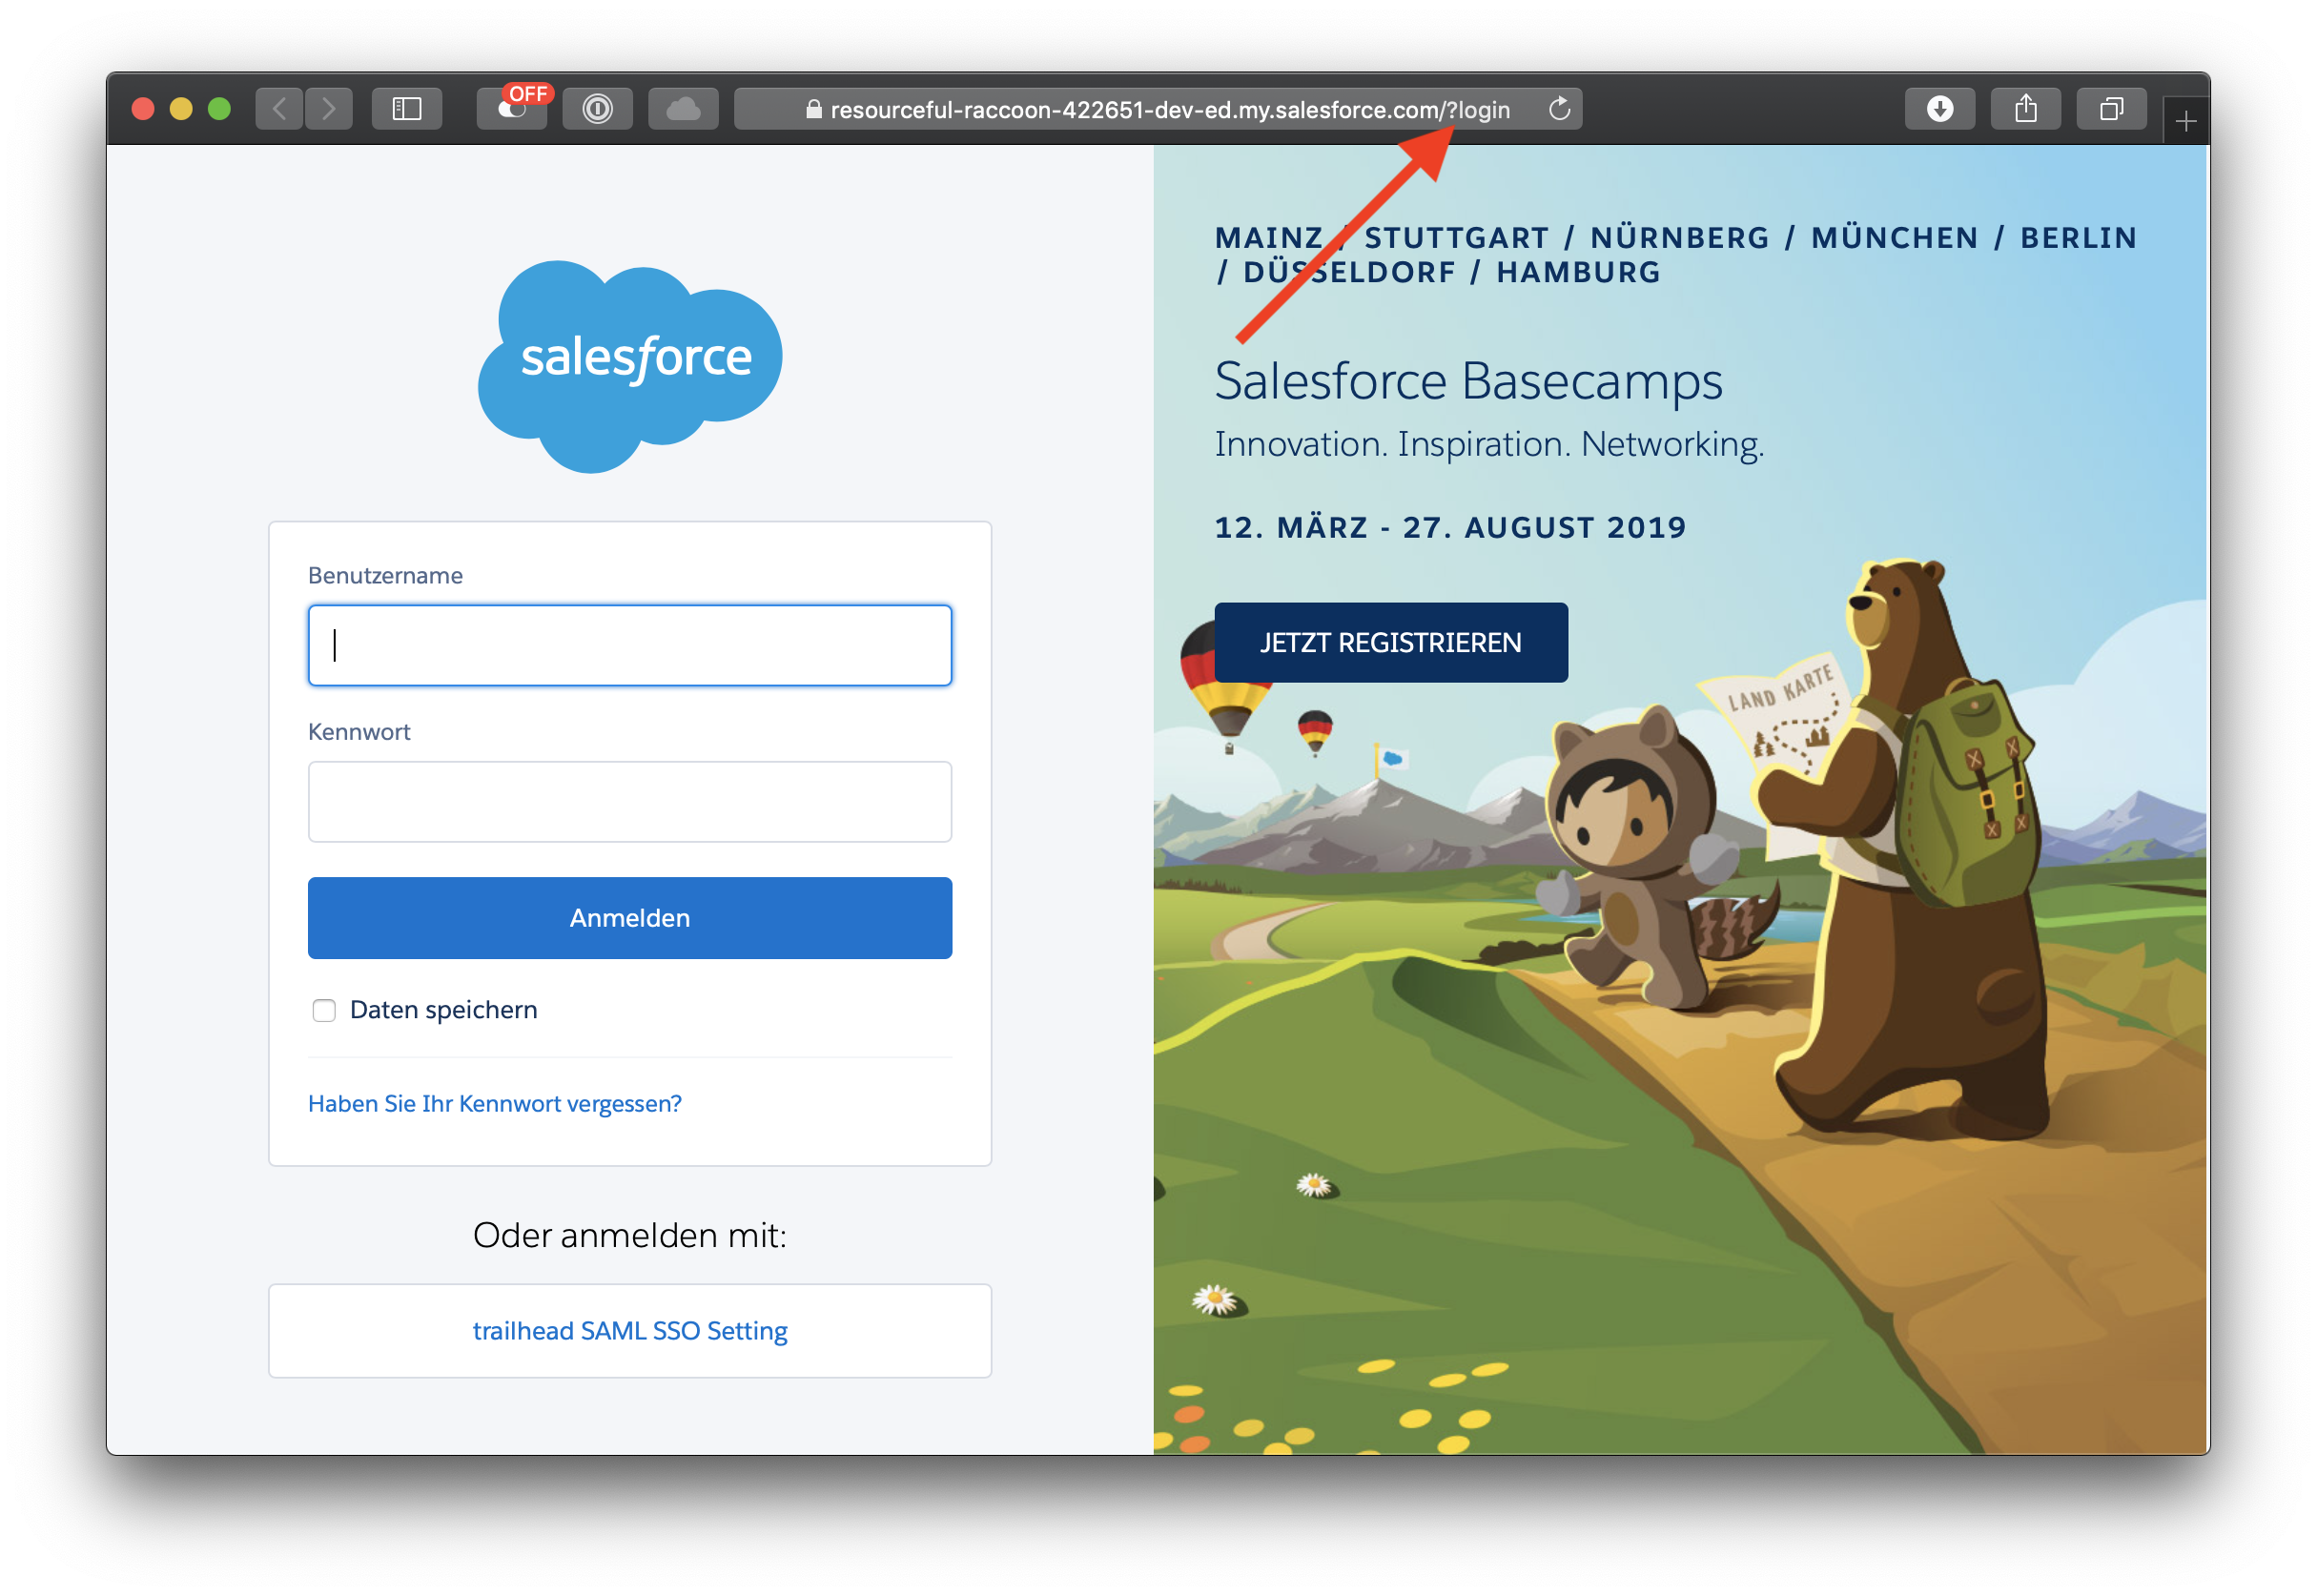
This option can be circumvented by users. They can still use <mydomain>.my.salesforce.com/?login to access the application and enter there username and password.

Salesforce My Domain with login parameter

User Setting “Is Single Sign-On Enabled”

One way to disable login via Username and Password is the User Setting “Is Single Sign-On Enabled”. The setting comes as part of “Delegated Authentication”.

The documentation of the user feature is minimal. Salesforce is referring to it only in a handful of articles. It seems like the feature was intended to route the username and password after entering it to the “Delegated Authentication Web Service” and not to disable other login mechanisms.

If the user’s profile has the Is Single Sign-On Enabled user permission, then Salesforce does not validate the username and password. Instead, a Web services call is made to the user’s organization, asking it to validate the username and password.

Single Sign on for Desktop and Mobile

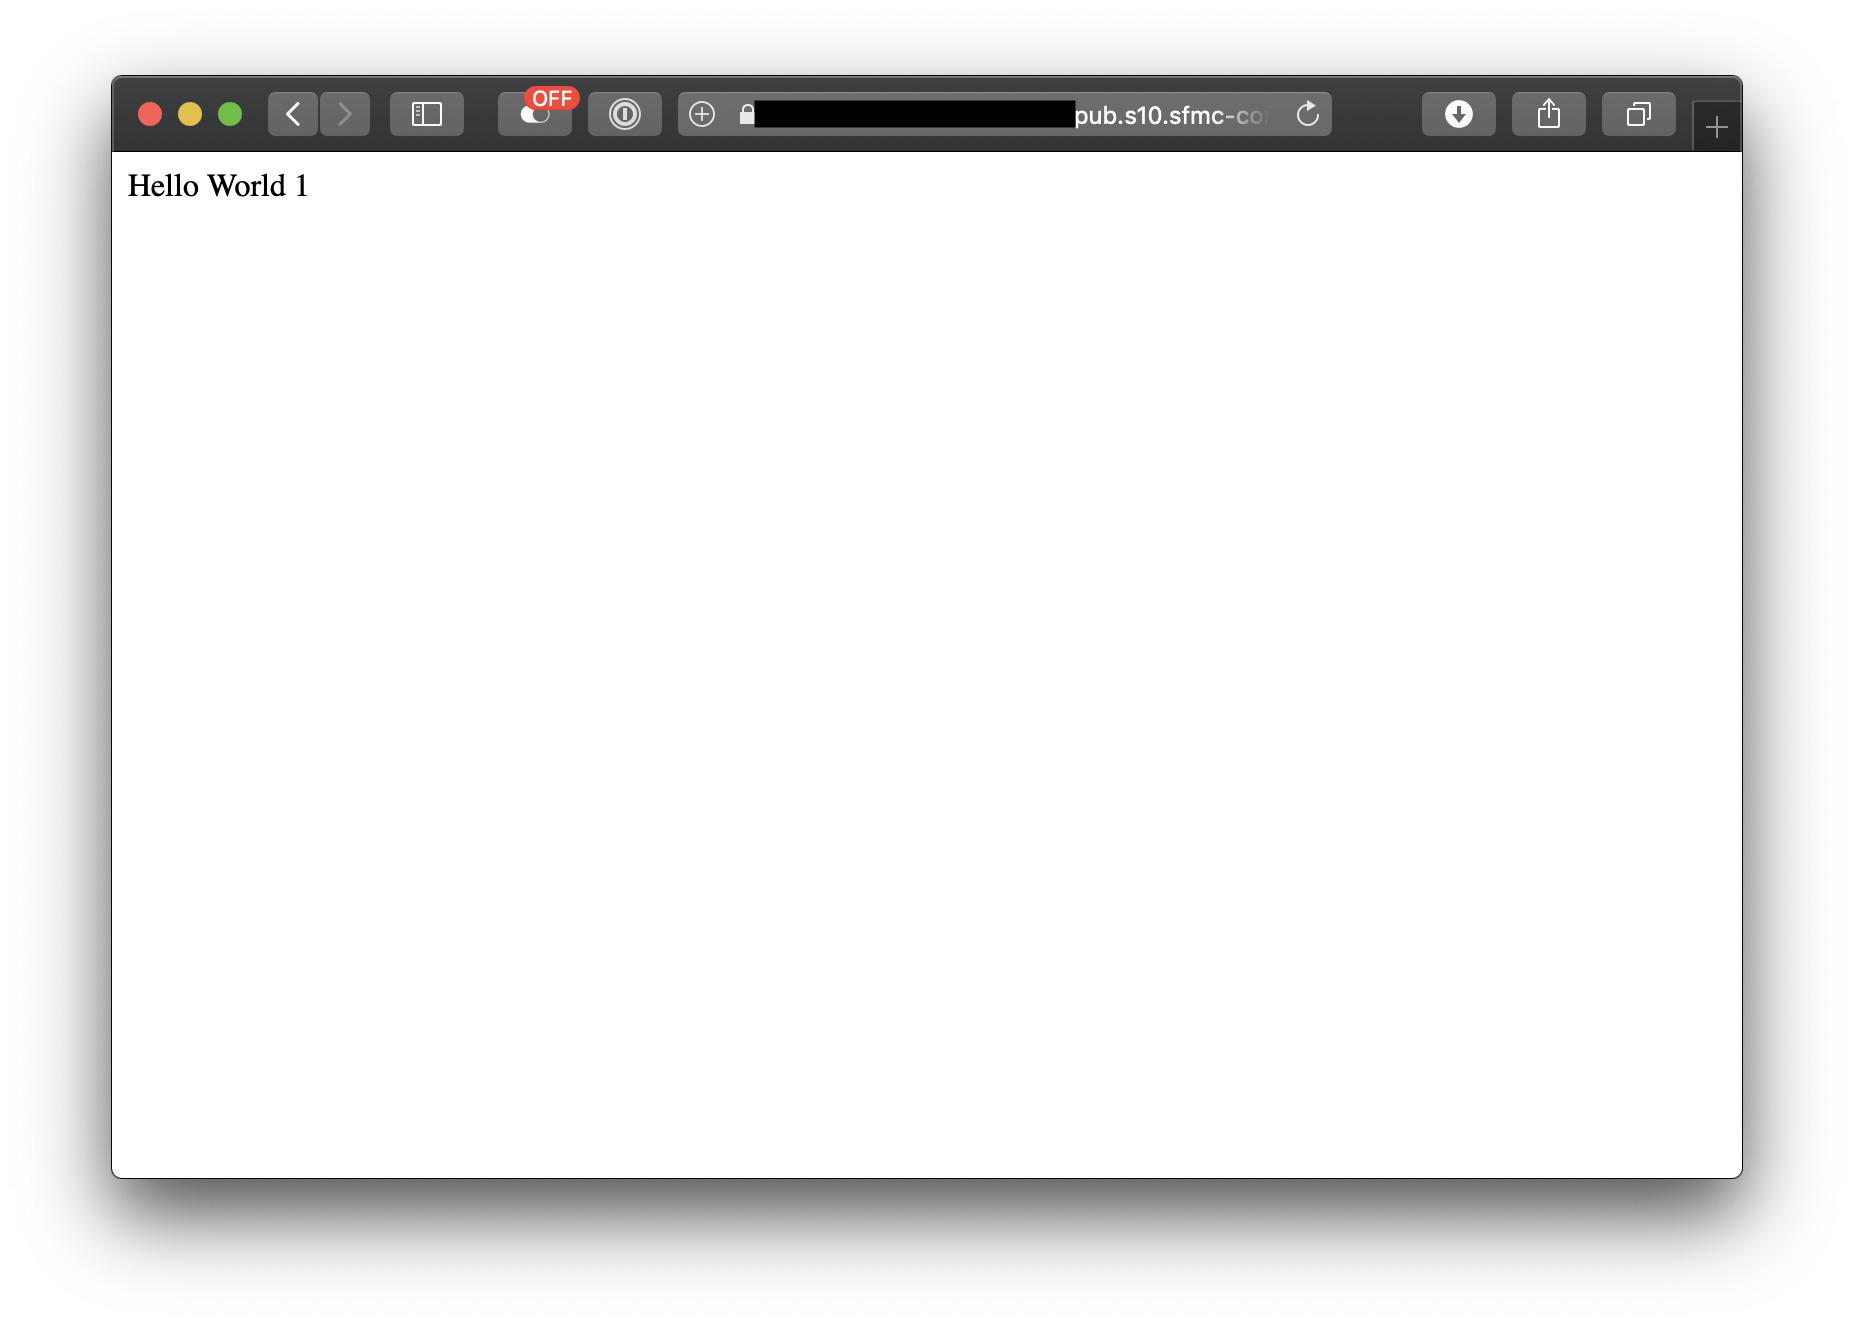
The setting can be enabled on Profile and Permission Set Level without entering the address of the delegated authentication service. This results in the side effect that users cannot login with Username and Password. Users that try to login with their username and password will see the following error message:

We can’t log you in because you’re only allowed to use single sign-on. For help, contact your Salesforce administrator

Error Message after entering username and password

This behavior has been documented by Ashish Agarawal and multiple others on StackExchange. However, the feature is not officially documented and can be removed at anytime. I would personally not recommend to go this route.

Transaction Security Policy – Salesforce Event Monitoring

Since 2016 Salesforce Orgs can be protected with Salesforce Shield. As part of Shield specific Transaction Security Policies can be enforced. Based on policies different transactions e.g. Logins or Report Exports can be prohibited. The setup of a new Transaction Policy is done in 3 steps:

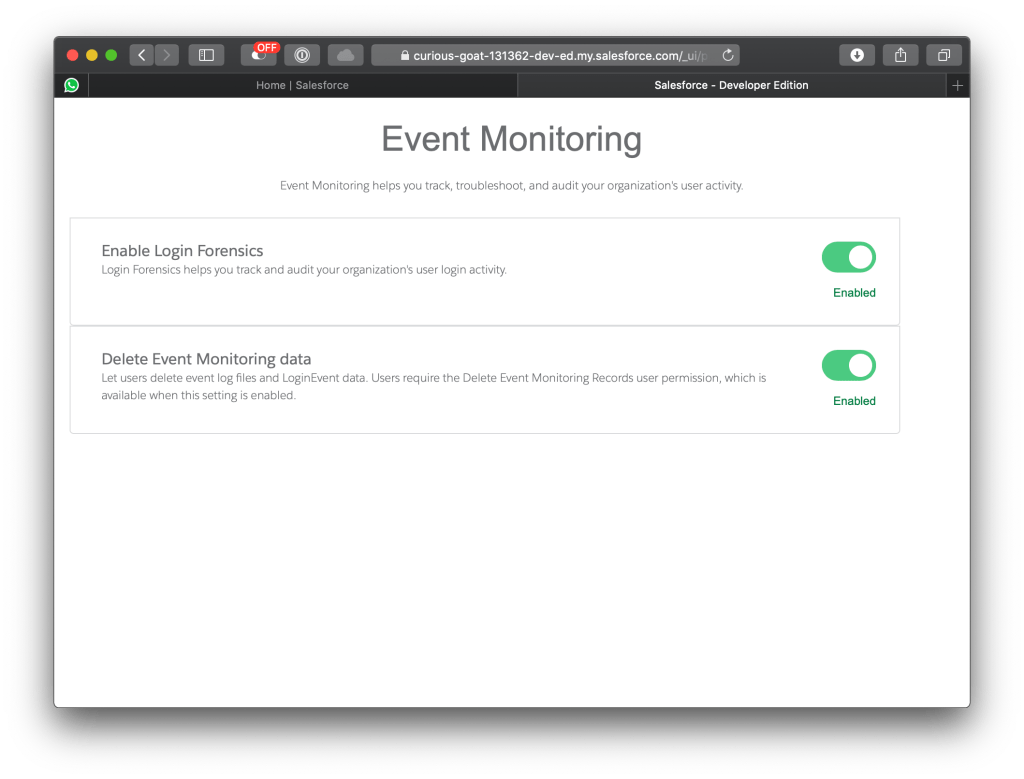
Step 1: Setup Event Monitoring

Transactional Policies are based on Salesforce Event Monitoring. After the feature licenses for Shield is activated, event monitoring can be activated:

Activate Event Monitoring

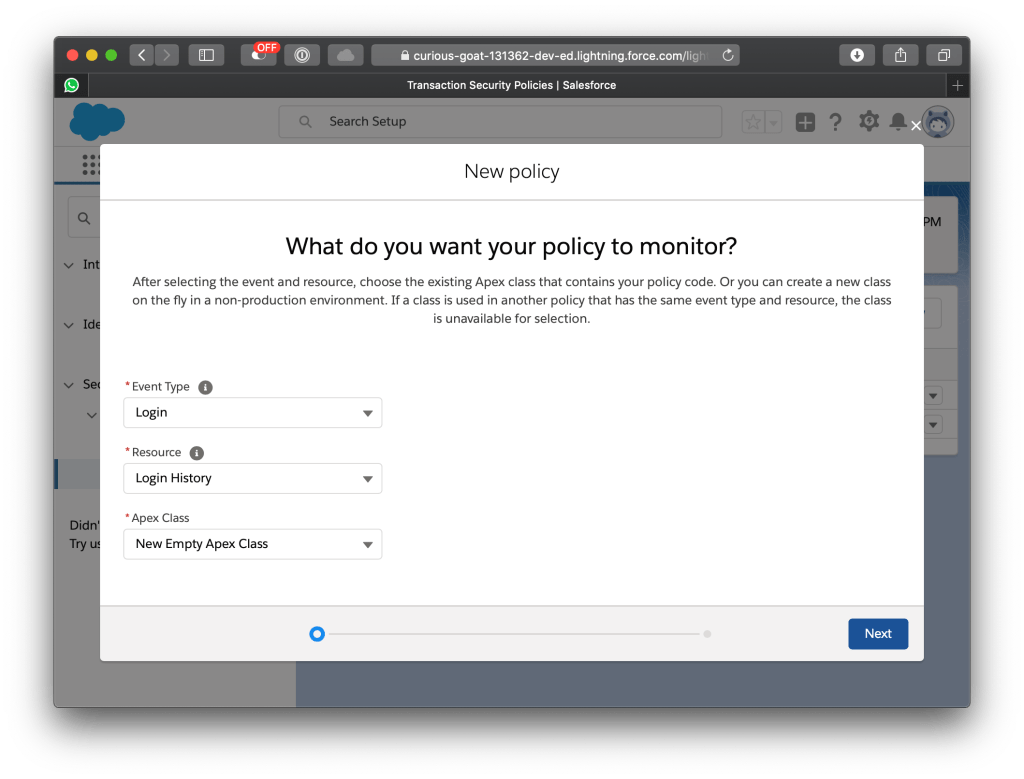
Step 2: Create a new Policy

Policies are based on three components: (1) a listener, (2) Condition, (3) Reaction. In the first step of the setup the event type must be selected (in this example “Login”) and the corresponding Resource “Login History”.

For each event defined in the listener a short piece of code is executed. The “Condition” detects if the policy is violated and triggers the reaction.

Create new Login Policy

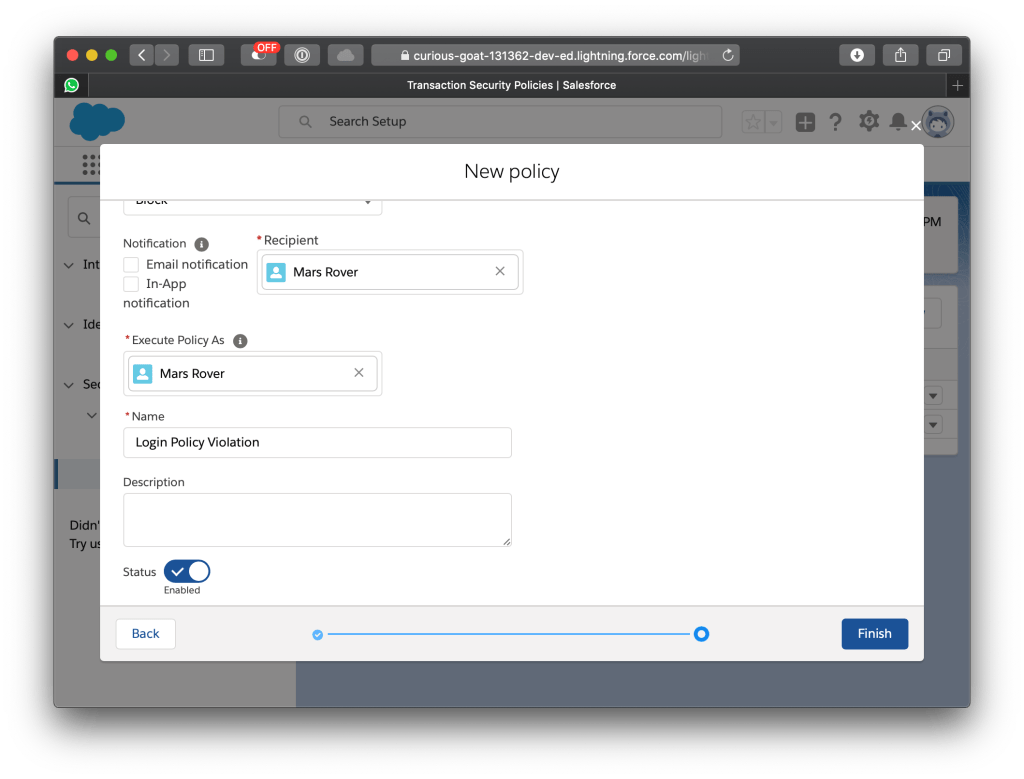
In the 2nd screen the reaction of a policy violation is configured. In this case the login is blocked and the administrator is informed via Email.

Reaction for a given Policy

Step 3: Write a Policy Condition

In order to restrict the login from any other identity provider that the one that has been selected, I implemented a short APEX class. The class checks for each login if the right Authentication Service is used.

global class LoginPolicyViolationPolicyCondition implements
TxnSecurity.PolicyCondition {
    private static final String ALLOWED_AUTHENTICATION_SERVICE_ID = 'XXXX';

    public boolean evaluate(TxnSecurity.Event e) {
        String loginHistoryId = e.data.get('LoginHistoryId');
        LoginHistory l = [   SELECT Id, AuthenticationServiceId FROM LoginHistory WHERE ID =: loginHistoryId ];
        return ALLOWED_AUTHENTICATION_SERVICE_ID !=
            String.valueOf(LoginHistory.AuthenticationServiceId);
    }
}

Finally

Salesforce Shield is the out of the box way to detect violations of policies and react accordingly. In comparison to the “Delegated Authentication option” the policies are designed to inform administrators about cases of violation.

News.Simple-Force

Keeping up with the latest news from the Salesforce Universe has not always been easy. Today more than 100 blogs exist in the Salesforce Universe. To keep up with what is new, I have built “News.Simple-Force” – a Salesforce news aggregator.

News.Simple-Force – The Salesforce News Aggregator

The website is incredible easy to use. Every hour the news aggregator checks for the latest news from the most known Salesforce Blogs. By visiting news.simple-force.com users can see what’s new in the world of Salesforce.

Right now the news aggregator only takes blogs into account. However, in the future more functions can follow such “most recent and highly noticed StackExchange Articles” or new videos posted by Salesforce and others on Youtube.

SFDX: Salesforce Package Versions depend on Scratch Org Definition

While implementing a Salesforce Package Version for my private Salesforce package, I encountered an interesting fact: The creation of the Salesforce Package Version is only possible if the right corresponding Scratch Org Definition file is provided.

Scenario

I noticed that the issue when I wanted to create a custom field that is dependent on the “Person Account” feature.

1. I first modified my scrtach org permission file to enable personaccounts.

1.png

2. I created a new scratch org.

2.png

3. After creating and adding a new field that dependet on Person accounts, I tried to create a new package version.

5.png

4. My new package version was rejected with the following error message:

ERROR:  Account.Person_Account__c: Field IsPersonAccount does not exist. Check spelling.

6.png

The error message does not indicate what is actually the issue. The system just suggest that the IsPersonAccount field is not existing.

Solution

The solution is comparable obvious. The Scratch Org Definition File is missing. As indicated in the documentation the file is not mandatory. However, it is required in case the package is dependent on specific Salesforce Org Features:

-f | –definitionfile DEFINITIONFILE Optional

The path to a definition file similar to scratch org definition file that contains the list of features and org preferences that the metadata of the package version depends on.

Type: filepath

By including the scratch org definition file the package version could be created easily without any further issues.

7.png

Learning: The scratch org definition file is not mandatory, but required in case the package is refering to any specific Salesforce feature.

Marketing Cloud: External Editors

Salesforce Marketing Cloud is a fantastic tool for Marketing Automation. I had the chance to participate in small and large scale Marketing Cloud implementation. As a result of that I developed several best practices such as the use of external editors.

External Editors such as c9.io or codesandbox.io have been essential for me for two reasons: (1) Version Control, (2) faster round-trip time.

Setup – External Editor

In the first step an external editor must be chosen. I recommend c9.io or codesandbox.io. In both cases the editor is able to serve content via HTTP.

The Editor is used to write Server Side Javascript or AMPscript.

codesandbox.io

In the example above you can see a quick “hello world” AMPscript.

Cloud Page to Execute the Code

To execute the code in Marketing Cloud a simple Cloud Page must be created. The Cloud page is able to load content from an external server and execute the Javascript and AMPScript that is visible on the page.

%%= TreatAsContent(HTTPGET("http://www.myserver")) =%%

Now only the cloud page must be loaded and the result is visible.

Development Lifecycle

The resulting development lifecycle is easy and fast:

  1. Code is written in the editor and saved.
  2. By reloading the cloud page the result is visible.

SFDX: Let’s get started – My first unlocked namespaced package

Some time ago, Salesforce released Salesforce DX. With the Winter Release 2019 the DevHub became available for Developer Orgs. Together with the 2nd generation of packaging it is now possible to create unlocked and managed packages with Namespaces. In this article I quickly describe the steps to create a developer controlled (unlocked), namespaced package.

Step 1: Dev Hub

To enable a Salesforce DevHub, I had to sign up for a new Developer Edition. The DevHub runs only correctly if  “my domain” is enabled and NO namespace is assigned to the DevHub Org.

Step 2: Namespace Org

For the registration of a Namespace (that is globally unique) a 2nd org must be setup. In the Menu (Setup -> Packages) I registered the Namespace “simpleforce”.

Screen Shot 2018-10-27 at 18.53.43.png

Step 3: Link Namespace to DevHub

Before linking a Namespace to the DevHub, my domain must be enabled. Without my domain the “Link Namespace” button is not visible.

Screen Shot 2018-10-27 at 18.57.53.png

The Linking Process is done in 2 steps: (1) I had to enter username and password of the org that holds the namespace. After confirming that the DevHub has access to that org, the namespace is linked to the DevHub.

Step 3: Setup Project

To create a namespaced package, a new project must be setup. A project can contain multiple packages. In my case the project is called simple-force:

sfdx force:project:create --name simple-force

A single DevHub can link multiple Namespaces. But a project can be only linked to a single Namespace. The namespace must be specified in the Project Definitional fine:

Screen Shot 2018-10-27 at 19.01.14.png

From now on all packages creates in this project will be part of the selected Namespace.

Step 4: Create the Package

To separate components that belong to my new package “ulog” from other components, I created a new folder and registered a new package called “ulog”:

mkdir ulog

sfdx force:package:create --name ulog --packagetype unlocked --path ulog

Screen Shot 2018-10-27 at 19.10.58.png

The created package is empty. I created a new scratch org and deployed the universal logger in to the scratch org. Using the force:source:pull command all components of the scratch org are getting downloaded:

// create scratch org
sfdx force:org:create -f config/project-scratch-def.json -u devOrg

// pull content
sfdx force:source:pull -u devOrg

To choose which components are part of my package, I moved the relevant components from “force-app” to the “ulog” folder:

Screen Shot 2018-10-28 at 14.22.10.png

Components such as profiles that are not needed for the package are not moving to the new folder.

After all components are in the right package folder. A new version of the package had to be created.

sfdx force:package:version:create -p ulog -x -w 10

All components are getting uploaded to Salesforce. And the new package becomes available for other orgs to install.

Step 5: Install the Package

To check if the package can be installed in a new org, I created a new scratch org and installed the package:

sfdx force:org:create -f config/project-scratch-def.json -u valorg

sfdx force:package:install -p 04t1t000001yUV2AAM -u valorg -w 10

Finally the package is successfully installed and my first namespaced package created!

My 10th Year in the Salesforce Ecosystem starts today

Back on August 25th 2009 I registered by first Salesforce Account. Since that time Salesforce has been the driver of my personal and professional life. I’m very thankful for the time and the people I met.

It is time to look back:

Salesforce as a University Project

In 2008 I started studying at the University of Mannheim. In our 3rd semester one of our new professors. Professor Mädche announced that a project will be part of his course “Wirtschaftsinformatik 2” (Information Systems 2). In the project we had to use a new Cloud Computing Platform to build a simple business process: The platform was Salesforce.

To learn more about Salesforce we, a group of friends and I, visited one of the early Salesforce Events “Cloudforce Essentials in Stuttgart”. We met Andreas von Gunten. Andreas called himself a Cloud Evangelist. He was the founder of a small Salesforce Consultancy called PARX and convinced companies in a speech to use future technology: Salesforce.

I was very impressed and tweeted that I met my the first “Evangelist” in my life. During lunch Andreas came over. He saw my tweet. We started chatting and explained the purpose of our visit: Learning more for our project. He offered to help us and we stayed in touch.

Back in Mannheim, I talked to our professor and he right away invited Andreas to give a speech in one of his lectures.

With two of my friends we started the Salesforce project. Lucky me, I took a video of it:

Wifo2 from Christian Deckert on Vimeo.
After our project was over, I started my first Salesforce Job as a Hiwi (Student Assistant). My job was to implement Salesforce for the chair of the professor. I implemented automations for book orders, chatter, opportunities and more.

During that time I visited my first Salesforce Conference in Frankfurt and took a photo with Sassy:

23489_370569559354_564094354_3706469_2303366_n-1_1__400x400-1.jpg

Salesforce Consultant @PARX

At the end of the 4th semester in Mannheim, I had to find an internship. It was part of my curriculum. I reached out to Andreas. I asked if I can stay for a 3 month internship. I did my first interview and was asked to say for 6 months. My university teachers told me that the curriculum was designed to run in sequence, and that missing half a year will get me out of the rhythms of studying. I decided to extend my work at PARX by another 6 months.

My first year in Zurich. PARX was a very small company. The company was already mainly focused on Salesforce. I got a lot of freedom for a 21-year old. One of my first projects was building a Web-Shop based on Salesforce Sites (a brand new technology).

This project became my companion for the next couple of years. I’m still proud of it. Especially since I developed multiple versions of it. Including a small framework for Websites on the Salesforce Platform: Die Akademie.

After the first year, I decided to stay with PARX and continue studying on the side. Over the years at PARX, I met a lot of great people: Beat, Manuel, Thomas, Michel… all great people. As in very job we had great and not so great clients. However, the majority was amazing: starting with the local groupon clone, an energy grid provider, a fashion company and more. More of my friends needed jobs / internship. Overall 5 people started, 4 of them are still very successful in the Salesforce World.

In 2012 I finally finished and got my Bachelor’s degree.

I worked for a year full-time at PARX. In Summer 2013, I decided to study again and moved to Mannheim. I kept working for the Swiss firm and later for the German subsidiary.

I finished my master’s degree in 2015 and moved back to Switzerland.

After returning to Switzerland I got more project management and technical architect tasks. I attended my first Dreamforce in 2015 and met my girlfriend. In winter 2017, I attended the CTA review board for the first time. I made it in all categories except 1. 😦
In the same year I decided to quite PARX and move on.

Deloitte and becoming a CTA

In April 2017 I started at Deloitte Digital Switzerland. A great place with incredible people. (I’m not sure if they want to get named… but the whole team was amazing.) I cannot say a bad word about Deloitte. It was a good place. Salesorce offered me to redo the one category of the CTA certification. I passed in May 2017 in London. The day before I attended the Salesforce Conference in London and took another photo with Sassy:

2017-11-01-PHOTO-00000010.jpg


Deloitte was a great place. However, it was time to move forward.

Accenture

In November 2017 I started at Accenture as a Manager. One of the first things I did in Accenture was going to my 2nd Dreamforce. As always a incredible experience. Accenture is a fantastic employer. I feel home at Accenture.

Next Steps

For me the last years have been amazing. I’m very thankful for what I have achieved.

What’s going to happen next?

  • Accenture is a fantastic employeer. This year I’m allowed to go there again.
  • I will marry the girl, I met at Dreamforce on August 30th.

Besides from that… let’s see what happens next..

Salesforce Certification Journey

One of the questions that comes up when I talk to colleagues that joined Salesforce Consulting recently is: “Which path should I take in my certification journey?”

When I started Salesforce the Paths were simple: Admin -> Advanced Admin, Developer -> Advanced Developer on top of that Salesforce introduced Service and Sales Cloud Consultants.

With the much richer ecosystem present today Salesforce as expanded and specialist even more. Today Salesforce offers kind of 3 or 4 major tracks:

On the Force Platform

  • The Developer / Architect Path
  • The Consulting Path with different specializations in the areas Service, Sales and Community (Not to forget CPQ)

In the Marketing Cloud

  • The Marketing Cloud Consultant Path
  • The Pardot Consulting Path

And for Comemrce

  • The Commerce Cloud Developer

Compared to some years ago the Salesforce landscape has changed and more certifications became available. I personally suggest to go one of the following routes:

Platform Consultant Journey

Salesforce-Consultant.png

Architect Journey

Architect-Journey.png

Marketer Journey

Marketer.png

Ecommerce Journey

Commerce-Cloud.png

How to: Store GDPR Privacy Preferences in Salesforce

Starting from late May companies must be compliant with the new GDPR regulation. Since Winter 18 Salesforce offers a new way to track the consent of users across leads and contacts: Individual

Concept behind Individuals

In the context of clients a single human person can appear as one or multiple leads and contacts. For example in the context of a pharmaceutical company a human person can be a patient, doctor, scientist and a shareholder at the same time.

Screen-Shot-2018-02-10-at-12.07.44.png

To ensure the right sharing of the person different contacts and leads have been created. In the example of a pharmaceutical company the doctor’s contact might be visible to the sales team, while the patient’s record isn’t. To make this possible multiple contacts must be created. However, it is still the same person.

When a person opts in or out of a channel / tracking this information has to be available for all different departments.

Salesforce Individuals is a simple place where all the privacy settings can be stored across multiple contacts and leads. The information is available to all departments.

6 Steps to enable Centralized Data Privacy Preferences

Step 1: Enable Individuals

The new Individual Object can be activated in the setup menu “Data Protection and Privacy”.

By enabling the checkbox the new object “Individual” becomes visible. As well 2 new lookups on Contact and Lead become available.

Screen-Shot-2018-02-10-at-11.56.32.png

Step 2: Add Privacy Preferences

The Individual Object is similar to every other object. Custom Fields can be easily added and layouts adjusted.

Salesforce already provides a list of common privacy settings like Don’t Process, Don’t Profile, Don’t Solicit, Forget This Individual.

Each company has different needs then it comes to privacy settings. In some cases a date has to be associated with a setting in other cases the version of terms and services has to be stored.

Salesforce gives clients the full flexibility and allows the configuration of additional custom fields.

Note: When you add privacy relevant data to the individual don’t forget to encrypt these fields with Salesforce Shield.

Step 3: Add Individual Lookups to Contact and Lead Layout

In each page layout the new individual lookup must be added. This lookup references the individual record.

Salesforce already had some standard fields to track the out-out for eMails and Fax. These fields can be removed, since they should be migrated to individuals.

Screen-Shot-2018-02-10-at-11.57.53.png

Step 5: Automate the creation of individuals

To make the use of individual records easier it makes sense to create a trigger that automatically generates an individual record in case the person is not known to the company before. Otherwise an existing individual record can be attached to the contact.

Step 6: Create Individual Records for existing Contacts and Leads

To make the implementation more uniform an individual records should exist for every contact and lead. There are two ways to run the creation of leads:

  1. ETL – With an ETL Tool like Informatica Cloud all contacts and leads are getting extracted and new individual records created. Multiple contacts and leads that are the same individual are getting lined to the same individual. The consent settings from contact and lead are getting replicated in the individual record.
  2. Batch Job – Salesforce suggests in the documentation to run a script that creates the individual records. However, it is important to note that this will work better for small and medium installations. In systems with multiple million contacts and leads ETL is the preferred option.

Extensions and other Systems

The consent to tracking is not only limited to Salesforce. Salesforce is a great place to store this information in a centralized way. With the Salesforce SOAP and REST API external applications can leverage the new feature.

Universal Log — The Next Generation Error Log based on Salesforce Platform Events

Since the beginning of APEX, developers are creating persistent event and error logs in Salesforce. Multiple Salesforce Bloggers explained their version of Error Logging in Salesforce:

All the mechanisms that have been available are using the “try-catch mechanism” and then storing a record in Salesforce. This approach comes with multiple downsides:

  • The error is getting catched and not reported to the next higher instance
  • It is impossible to see from the “Apex Job Log” if batch jobs are successful or not, since all catched exceptions are reported as “success”.
  • An additional DML operation is needed.
  • The Error Log was limited to Salesforce APEX Code

In the past this approch was the only solution to handle exceptions and store them persistent in Salesforce. But with Platform Events a new generation of Error Logging becomes possible.

Universal Log — The Next Generation Error Log

Platform Events and the Salesforce Event Bus allow the implementation of an even more sophisticated solution. I call my solution Universal Log.

My Version of the Log allows not only to store information and exceptions from APEX, the solution supports even configuration like process builder, workflows and external applications.

Architecture of Universal Log

Uniersal Log leverages the out of the box Event Bus in Salesforce. All kinds of services, such as Apex Code, Triggers, Batches, External Applications and others can create Log Events. And send them on the Event Bus. There they can be captured and translated into a persistent log.

Screen-Shot-2018-02-09-at-23.37.08.png

Architecture of Universal LogUniversal Log Components

The system is based on 4 major components:

  • The Logger Class that creates based on Exceptions, Flows and other functionality Log Events
  • The Log Event that is used as a transport tool to be catched by
  • The Log Event Trigger that creates based on the event a log record
  • The Log Record That is storing the log information persistently

The Universal Logger Class

The Universal Logger Class can be called during the execution of a class similar to other error logs the error is getting catched and then logged to the log.

But with one difference: The Exception is re-thrown and becomes visible.

Example

This simple code is going to throw an Exception. Now the universal logger sends the exceptions to the event bus and the class re-throw the exception.

try
{
    Integer i = 12/0;
}
catch(Exception e)
{
    UniversalLogger.log(e);
    throw e;
}

The re-thrown exception will be presented to the next higher level. E.g. the developer console

Screen-Shot-2018-02-10-at-00.31.47.png

The universal logger take the exception and put the exception on the bus.

global class UniversalLogger
{
    global static void log(Exception e)
    {
        UniversalLogEvent__e l = new UniversalLogEvent__e();
        l.Stacktrace__c = e.getStackTraceString();
        EventBus.publish(l);
    }
} // Simplified Version

Universal Log Event Trigger

The Universal Event Log Trigger is the last component that then finally converts the Event to a persistent reocrd.

trigger UniversalLogEventTrigger on UniversalLogEvent__e (after insert)
{
    List<Log__c> logs = new List<Log__c>();
    for(LogEvent__e l : trigger.new)
    {
        logs.add(new Log__c(Stacktrace__c = l.Stacktrace__c, ...));
    }
    Database.insert(logs);
}

Conclusion

Salesforce Event Bus as a base for an Error Log is a strong foundation for error logs. All kinds of applications and services can use the error log. The new error log allows to present error messages back to the user, salesforce batch log, while keeping a detailed log in a custom object.

Future Extensions

For a future Version of Universal Log I plan to integrate NewRelic to give even better visibility into the log.

Best Practice: Secure API Keys in Salesforce — Example: Google Firebase

Some time ago Salesforce introduced Named Credentials as a new way to secure secrets in Salesforce. In this post I will explain how to secure API Keys in Salesforce and make callouts to external systems without presenting the secret to developers.

1-p0asVKOPdPeMxYoHyTtE-A

In Winter ’16 Salesforce introduced Named Credentials. Before the common way to store passwords and api keys were “Custom Settings”.

Custom settings had the clear downside that username and password as well as API Keys, Tokens and oAuth Secrets where stored openly and accessible for everyone with access to custom settings.

Named Credentials in comparison do not present passwords and secrets to the user or developer.

How secure are Named Credentials?

Salesforce is recommending to use Named Credentials for all types of callouts.

Named Credentials are a safe and secure way of storing authentication data for external services called from your apex code such as authentication tokens. We do not recommend storing other types of sensitive data in this field (such as credit card information). Be aware that users with customize application permission can view named credentials, so if your security policy requires that the secrets be hidden from subscribers, then please use a protected custom metadata type or protected custom setting. For more information, see named credentials in the online help and training guide.
Source: https://developer.salesforce.com/page/Secure_Coding_Storing_Secrets

As mentioned by Salesforce users with “Customize Application Permissions” can view named credentials. This applies for the named credential itself.
However, when it comes to the passwords stored in named credentials, they are not visible to users or developers:

  • Credential Passwords cannot be made visible in the UI
  • Credential Passwords cannot be accessed through API
  • Credential Passwords cannot be made visible in Debug Logs

Only in the moment the HTTP Request to external systems is executed, Salesforce inserts the password into the request and sends the request to the External Service.

The External Service can then use the password or other credentials to verify the request.

Setup Named Credentials: Example Firebase

Firebase is a service by Google that can be used to send push notifications to users. Salesforce can call firebase and send a push notification to specific users.

1-N2PrV3b95tBsRRdUXuHY0A

Step 1: Setup Named Credentials

To setup the API Key I first had to setup a new server key in firebase.
(Firebase → Project Settings → Message Key)

1-zzewkVIuxqc5Lnw6OUfe4g

In Salesforce the Named Credential for Firebase can be created now.
(Setup → Quick Search → Named Credentials)

1-dpiln4cB8W-5hLf-C5qGZQ

The following properties have to be entered:
The Endpoint that has to be called is fcm.googleapis.com.
As Identity Type I have chosen Named Principal, since the API key is the same for the whole org.

  • The Authentication Protocol is “Password Authentication”.
  • As Username I entered a dummy value.
  • The password is the API Key.

To use the password in the header of my request, the tick box “Allow Merge Fields in HTTP Body” must be checked.

Step 2: Callout

To be able to call Firebase, I added Firebase to my “Remote Sites” (Setup → Quick Search → Remote Site).
Sending out a request with Named Credentials is using the same functionality as in any other APEX HTTP request:

String message = ‘XYZ’;
// HTTP Request
HttpRequest req = new HttpRequest();
// Callout extended by /fcm/send
req.setEndpoint(‘callout:Firebase/fcm/send’);
req.setMethod(‘POST’);
// Authentication
req.setHeader(‘Authorization’, ‘key={!$Credential.Password}’);
req.setBody(message);
// send request
Http http = new Http();
HTTPResponse res = http.send(req);
123456789101112

As Endpoint for the HTTPRequest I used callout:Firebase. This indicates to Salesforce that the Named Credential Firebase is used.

During the execution of the HTTP request “callout:Firebase” is getting replace with the URL stored in the Named Credential. The placeholder {!$Credential.Password} is replaced by the password stored in Salesforce.

Step 3: Result

The Debug Log proofs: The request was successfully send to Firebase.

1-Vk8K1ZCDnBBL38-ndWv2gA

Conclusion

Named Credentials are the secure way to store credentials for callouts in Salesforce.